

A closet can have plenty of floor area and still be frustrating to use. Shelves sit at the wrong height. One rod has to hold everything that hangs. Corners swallow whatever gets pushed into them, and the space above the top shelf goes unused. Rearranging the clothes won’t fix this. The structure itself is working against you.
That is the situation custom closet systems are built to solve. Don’t squeeze your belongings into a standard layout. Design it around what you own and the exact space you have. This guide covers whether a custom system makes sense for your home. It also explains how to measure and plan. You’ll learn which components and materials to consider. We’ll also cover what the project is likely to cost. You’ll also learn how to keep the system useful as your needs change.
At Design & Supply, we design custom closets across Greater Montréal, so this guide uses what we see in real homes.
Is a Custom Closet System Right for Your Home?
A custom closet system is a storage structure. It’s made of shelves, rods, drawers, shoe storage, and accessories. Every piece is sized to fit a specific closet. The key difference from a store-bought kit is fit. Kits come in fixed widths and preset layouts. Gaps and dead zones are common. This is especially true in rooms that aren’t perfectly square.
A custom approach tends to pay off in a few situations:
- Awkward spaces. Sloped ceilings are hard to fill with standard parts. So are L-shaped closets and closets under stairs. Rooms with bulkheads or columns have the same problem.
- Tall ceilings. Unused vertical space is often the easiest place to add storage. Use it for seasonal items on upper shelves. You can also add an extra hanging tier.
- Specific wardrobes. Someone with many long coats and dresses needs a different space. Someone with mostly folded knitwear and denim needs something else.
- Shared closets. Two or more people may share a closet. Each can get a section built around their own habits.
Not every closet needs a fully custom build. A simple reach-in with a single rod and shelf may be well served by a modular or wire system. The question is whether a standard layout wastes meaningful space. Or does it make daily routines harder than they should be?
There’s also a resale angle. Well-planned built-in storage can make a home feel more functional. It can also feel more finished. Some buyers value that. It shouldn’t be treated as a guaranteed financial return, though. The stronger reason to invest is how much easier the closet makes everyday life.
What a Custom Closet System Includes
The structure is made of a few building blocks. The same pieces get rearranged to suit very different rooms:
- Vertical panels form the frame. They carry the weight of everything else. Thickness and material matter, especially on long spans.
- Rods handle hanging clothes, at one or more heights.
- Shelves hold folded items, bags, and baskets.
- Drawers keep small items contained and out of sight.
- Shoe storage takes several forms. Options include flat shelves, angled shelves, and pull-out racks.
- Accessories such as tie and belt racks, valet rods, pull-out hampers, and pants racks.
The three broad tiers of closet systems are worth knowing as you start comparing options:
Wire systems are inexpensive and flexible. They’re a reasonable starting point for small closets or rentals. Modular systems offer a cleaner built-in look with more finish options. Fully custom work suits unusual rooms. It’s also the choice when you want the closet to look built into the home.
Measure the Space Before Designing
Small measuring errors cause large installation problems. A quarter-inch discrepancy on a long wall can mean panels that won’t sit flush or doors that rub. Walls are rarely perfectly straight. Measure each dimension in at least three places. Check the width at the top, middle, and bottom of the wall. Do the same for height and depth.
Use the smallest reading as your working dimension, since that’s the one the system has to fit. If you measure a wall and get 95⅞”, 96″, and 96⅛”, plan for 95⅞”.
Then sketch the closet on paper and mark everything that affects the layout:
- Door and window positions, and which way doors swing
- Bulkheads, soffits, and sloped ceiling sections
- Baseboards and any baseboard heaters
- Vents, outlets, and light switches
- Attic hatches or access panels
Those details are easy to overlook and expensive to discover late. A vent behind a drawer bank or an outlet covered by a panel can force a redesign.
Design & Supply’s 3-Step Space Planner lets you send measurements, photos and videos. It doesn’t replace professional measuring, but it gives our designers what they need to start.
Plan the Closet Around Your Wardrobe
This step does more for the finished result than any material or finish choice. Before ordering shelves, count what needs to hang. Then count what can be folded. Finally, count what needs a drawer or a basket.
Take an evening to inventory your belongings. Roughly sort them into:
- Long-hanging items: dresses, long coats, robes
- Short-hanging items: shirts, blazers, folded-over pants, skirts
- Folded clothing: sweaters, jeans, t-shirts, activewear
- Shoes: by type, since boots, heels, and sneakers need different space
- Bags and accessories: handbags, belts, scarves, hats
- Small items: underwear, socks, jewelry, watches
- Seasonal or occasional items: winter coats, formal wear, luggage
- Linens, if the closet will share duty with bedding or towels
The count tells you how much of each type of space you need. A person with many shirts and trousers gets more capacity from double-hang sections. One tall rod wastes that space.
Someone with mostly knitwear and denim may need more shelving and drawers. They need less hanging space.
Don’t design from a catalog diagram. Design from your own inventory. Otherwise you can end up with a beautiful closet that still doesn’t hold your things.
Think about change as well. Children outgrow clothes quickly. Wardrobes shift over time too. Leave roughly 10 to 15 percent of the storage as open capacity. That cushion keeps the closet from feeling full the day it’s finished.
Choose the Right Components
Each component earns its place by solving a specific problem. Match them to your inventory. Otherwise the design becomes a collection of features.
Hanging sections. Double-hang means one rod above another. It roughly doubles hanging capacity for shirts, jackets, and folded pants. Your wall width stays the same.
It only works for shorter garments. Reserve a single-hang section for dresses and coats.
As a general guide, double-hang rods sit around 40″ and 80″ from the floor. A single long-hang rod sits around 70″ to 72″. These heights vary with ceiling height. They also depend on your longest garments. Measure your own clothes instead of relying on a standard.
Drawers. These suit small, folded, or private items such as undergarments, socks, and jewelry. They also keep visual clutter down, since contents stay out of sight. Look for soft-close, full-extension slides, which let you reach items at the back.
Open shelves. Good for sweaters, bags, and baskets. Be careful with depth: a deep shelf isn’t automatically a useful shelf. Items stack behind one another and get forgotten. Shelves for folded clothes work best at moderate depth. Around 14″ to 16″ is common.
Shoe storage. If you keep running out of room for shoes, dedicated storage prevents them from taking over the floor. Flat shelves work for sneakers. Angled shelves with a front lip suit heels. Pull-out racks make a deep section easier to reach.
Accessory inserts. Pull-out belt and tie racks, valet rods, and hampers earn their place. That’s true when items are used daily. They need to stay within reach. If you rarely use ties or belts, skip them and give the space to something you do use.
Corner solutions. Corners are the hardest place to use well. Options include corner shelves, angled hanging sections, and wraparound shelf units. Each keeps the corner from becoming an unreachable pocket.
Adjustable shelves and rods usually mount through a row of holes in the vertical panels. They let you shift the layout when a wardrobe changes. A child’s needs change too. This feature matters more than almost any other for long-term usefulness.
Materials, Finishes, and Hardware
Material choice affects appearance, durability, cost, and how the closet handles humidity. No single option is the best for everyone.
Melamine (thermally fused laminate). This is a common choice for modular and mid-range custom systems. It’s available in white and a range of wood tones, wipes clean easily, and is cost-effective. Edges and corners can chip if knocked hard, and it isn’t ideal in damp spaces.
MDF with a painted finish. MDF takes paint smoothly and suits clean, minimal designs. It can swell if exposed to moisture, so it’s best kept away from damp areas.
Wood veneer. Veneer gives the look of walnut, oak, or other species at lower cost than solid wood. Quality varies, so ask how the veneer is applied and finished.
Solid wood. The most durable and repairable option, and the most expensive. It’s a good fit for statement pieces, visible faces, and high-end closets.
Many closets mix materials. A durable, budget-friendly material works for the internal structure. A higher-grade finish goes on visible fronts.
For finishes, match the closet to the rest of the room. Matte white suits a small modern bedroom. Warm oak works with traditional homes. Darker tones can suit a larger primary suite.
Hardware deserves attention because you touch it every day. Brushed nickel and matte black are popular rod and handle finishes. Soft-close hinges and undermount drawer slides improve how a closet feels to use. You’ll notice the difference daily.
For doors, sliding doors save swing space. Hinged doors give full access. Bi-fold doors fit narrow openings. Mirrored fronts can make a small bedroom feel larger.
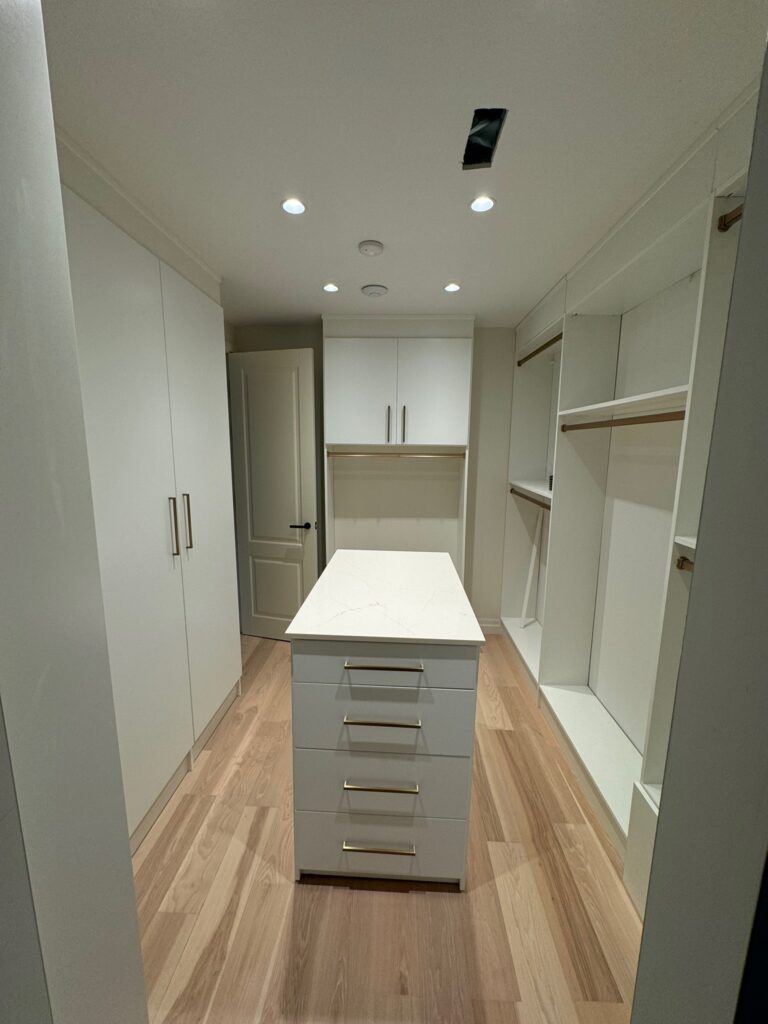
Designing a Functional Walk-In Closet
A walk-in closet works best when it’s planned as a set of zones, with enough room to move between them. Think about what you reach for every morning and put it where it’s easiest to get to.
Zoning. One approach is to dedicate a wall to everyday hanging clothes. Give another wall to formal or long garments. Use a third for folded items, drawers, and accessories. Shoes can have their own section, ideally at a comfortable height for the pairs you wear most. Items you rarely use belong on high shelves or in hard-to-reach corners. Seasonal clothing and luggage are good examples.
Depth and walkway. Hanging clothes need roughly 24″ of depth so garments don’t press against the wall. Leave enough clear floor that two people can pass or a drawer can open fully without blocking the way. Around 36″ of clear walkway is a common target, though the right number depends on the room.
Mirror and island. A full-length mirror is useful in nearly any walk-in. An island, bench, or central dresser unit only makes sense if the room is large enough to keep the walkway clear. In a modest walk-in, an island makes the space feel tight. It won’t feel luxurious. A wall-mounted bench or fold-down surface may serve better.
Finishing touches. A pull-out valet rod helps you lay out outfits. A velvet-lined jewelry drawer keeps small items safe. A built-in bench makes putting on shoes easier. These small additions make the closet easier to use day to day.
Lighting and Smart Storage Features
Most closets rely on a single ceiling fixture. It leaves shadows on lower shelves. The back of hanging sections stays dark too. Good lighting makes the whole closet easier to use.
The most useful additions come first:
- Overhead lighting provides general illumination. Make sure it’s bright enough and positioned so it isn’t blocked by hanging garments.
- Under-shelf LED lighting brightens the hanging zone below each shelf. That zone is often the darkest area.
- Vertical LED strips along panel edges light the full height of a hanging section evenly.
- Motion-activated lighting switches on as you enter. It’s handy when your hands are full. It also helps when you’re getting dressed early.
- Drawer lighting that turns on when a drawer opens makes it easier to see items at the bottom.
Some people add hidden outlets. Others add a charging drawer for watches and devices. Smart-home controls for voice or scheduling are optional extras. They’re convenient for some households. They aren’t essential. Get the basic lighting right first.
Budget and Installation Considerations
Closet costs vary widely, and any single number should be treated as a rough guide. The main factors are:
- Closet size and complexity
- Materials and finishes
- Number of drawers, which are among the more expensive components
- Hardware quality
- Doors, mirrors, and glass fronts
- Lighting and electrical work
- Accessories and specialty inserts
- Installation and any wall or floor repair
- Costs and availability differ by location. They vary by province and city across Canada.
A small reach-in with a basic wire or modular system sits at the low end. A mid-range modular or semi-custom system costs more. A fully custom walk-in with drawers, finishes, and lighting sits at the top. For a realistic figure, ask for quotes based on your own measurements and wish list.
If the budget is tight, phase the project. Install the core structure first. That means the hanging sections and key shelving. Add drawers, accessories, and lighting later.
Also account for related work. This includes removing old shelving, patching walls, and painting.
DIY or Professional Installation
Both are reasonable depending on the project.
DIY can make sense for:
- Simple modular systems and wire systems
- Straightforward reach-in closets
- Homeowners comfortable with measuring, locating wall studs, and mounting tracks securely
Professional installation is worth considering for:
- Large walk-in closets
- Uneven walls or older homes where nothing is square
- Sloped ceilings and complex layouts
- Built-ins with integrated lighting or electrical work
- Custom cabinetry with heavy drawer banks
DIY installation isn’t always easy. Heavy loads need to be anchored into studs or appropriate fasteners. Small errors compound across a long wall. At the same time, professional installation isn’t always necessary for a simple closet. Be honest about your experience and the complexity of the space.
Timing depends on the project. A typical custom job moves through three stages. Those are design and planning, manufacturing, and installation.
Ask any provider for a schedule specific to your closet. Don’t rely on a general estimate.
Designing for Future Changes
A good system adapts. Adjustable shelves and rods let you reposition components as needs shift. Clothing, hobbies, and family life all change. You can reconfigure without starting over.
Many systems also let you add accessories later. Examples include another drawer bank, a pull-out shoe rack, or extra baskets.
When planning, leave room to grow and avoid locking every section into a single use. A shelf that holds sweaters now might hold a child’s folded clothes later. A hanging section can be shortened or lengthened too.
Maintenance
Closet systems need little upkeep, but a regular routine keeps them working well:
- Wipe melamine and painted surfaces with a damp cloth. Avoid harsh cleaners that can dull the finish.
- Tighten hardware once a year, especially on rods, hinges, and drawer slides.
- Check LED batteries or drivers if you have lighting installed.
- Rotate seasonal clothing between primary and secondary storage each spring and fall.
- Review what you actually wear. If something hasn’t been touched in a year, consider donating it so it stops taking up prime space.
If something stops working, repair the part. A sagging shelf or a worn slide is a good example. Replacing one part is usually easier than redoing the system.
Your Next Step
Start with two things that cost nothing. Measure the closet carefully. Then take inventory of what needs to be stored.
With those in hand, you can sketch a layout. You can compare modular and fully custom options. You can also get quotes that reflect your real space.
At Design & Supply, you can book a free live online design session. We’ll design your closet with you on screen and give you a quote, often the same day.
A well-planned custom closet system should still serve you years from now. The planning you do at the start makes that possible.